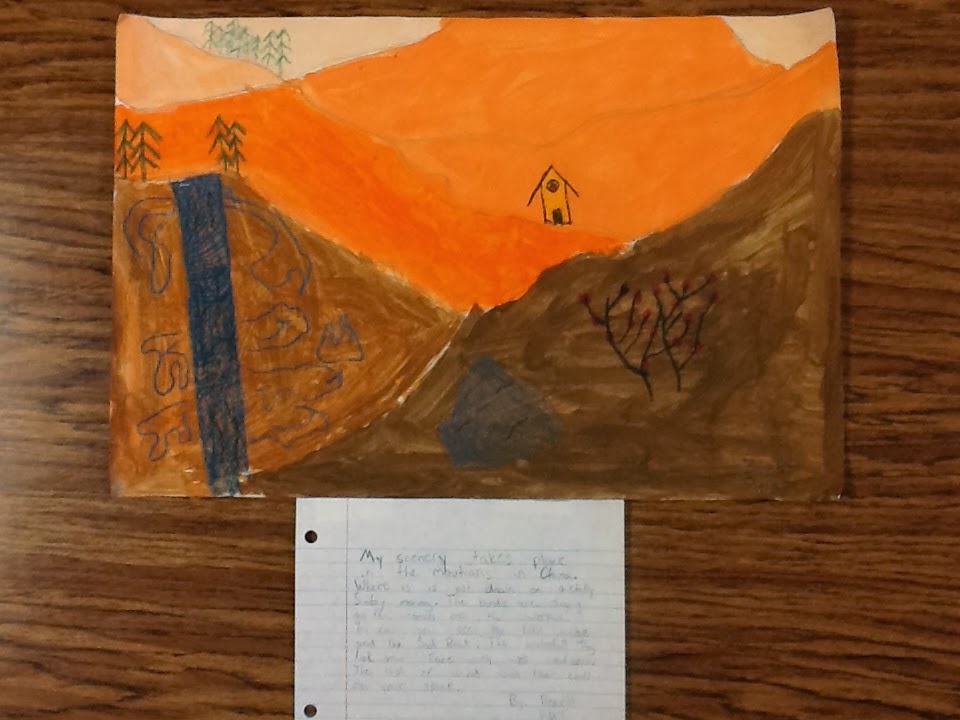
Another project I did with 4-6th grade involving tints and shades. We went over how the front layers have more detail, and how things get smaller and more faded as they are further away. Students picked out one color for their artwork and were seated with other students using those same colors. Students added details with crayon/oil pastel after the painting part. To finish, I had the students write a 6-sentence paragraph describing the scene. These turned out so nicely!
Vocabulary:
Monochromatic
Tint
Shade
Perspective
Landscape
Showing posts with label Landscape. Show all posts
Monday, February 24, 2014
Thursday, October 11, 2012
2nd Grade: Autumn Trees
What better way to bring in the fall than with a project about the trees and their autumn leaves?!
I started this lesson out by passing out a piece of construction paper. I told students to pick a crayon: brown, tan, gray, black, etc. On the board I demonstrated how to draw a tree as the students did each step along with me.
1. Draw two parallel, vertical lines that go from the bottom to about the middle of the page.
2. Curve the lines outwards, away from each other
3. Use "V's" to create lots of branches.
Obviously, I am not going into too much detail on here since I'm sure other art teachers already know how to draw a tree!! If not, there are many tutorials online.
For the tissue paper, I used red, orange, and yellow. Each student was to use all three of these colors. I only instructed students to put leaves around the bottom of the tree and on the branches of the tree. Some students, however, wanted to make falling leaves. This I allowed. Any time that a students wants to be creative with their art, my heart leaps with joy and I nearly shout "YES, DO THAT!"
Here are the steps for applying tissue paper:
1. Rip off a small piece of tissue paper.
2. put a pencil (eraser end) down in the middle of the ripped tissue.
3. crinkle the excess tissue up, around the pencil. Hold it like that.
4. Put a dot of glue where you want the "leaf" to go.
5. Push the tissue/pencil down onto the glue, let go, and lift up! Don't flatten the tissue!!
These turn out REALLY nice. I did these with my students during student teaching. It's definitely a lesson I want to keep doing!
I started this lesson out by passing out a piece of construction paper. I told students to pick a crayon: brown, tan, gray, black, etc. On the board I demonstrated how to draw a tree as the students did each step along with me.
1. Draw two parallel, vertical lines that go from the bottom to about the middle of the page.
2. Curve the lines outwards, away from each other
3. Use "V's" to create lots of branches.
Obviously, I am not going into too much detail on here since I'm sure other art teachers already know how to draw a tree!! If not, there are many tutorials online.
For the tissue paper, I used red, orange, and yellow. Each student was to use all three of these colors. I only instructed students to put leaves around the bottom of the tree and on the branches of the tree. Some students, however, wanted to make falling leaves. This I allowed. Any time that a students wants to be creative with their art, my heart leaps with joy and I nearly shout "YES, DO THAT!"
Here are the steps for applying tissue paper:
1. Rip off a small piece of tissue paper.
2. put a pencil (eraser end) down in the middle of the ripped tissue.
3. crinkle the excess tissue up, around the pencil. Hold it like that.
4. Put a dot of glue where you want the "leaf" to go.
5. Push the tissue/pencil down onto the glue, let go, and lift up! Don't flatten the tissue!!
These turn out REALLY nice. I did these with my students during student teaching. It's definitely a lesson I want to keep doing!
Here are the final products displayed in the hallway!!
Some students added tire swings, birds, etc. I love them all!
Close-up view!
Aren't these great?!
Monday, September 10, 2012
Linear Landscapes: 3rd Grade
I made this lesson during my student teaching. Basically, 3rd graders create a landscape using lines only! It sounds simple, but a lot of them have a hard time grasping this concept. I tried to assist by creating an example.
I started the lesson by talking about this piece by Emil Harmin. We talked about the types of lines that are found in the picture. I also asked students about the texture the line-types create i.e. bumpy, flowy, windy, etc.
I showed this photograph:
I started the lesson by talking about this piece by Emil Harmin. We talked about the types of lines that are found in the picture. I also asked students about the texture the line-types create i.e. bumpy, flowy, windy, etc.
I showed this photograph:
And this was the "teacher's example" I created to demonstrated how to create a landscape using lines only.
Previously, I did a watercolor wash on top of the landscapes; I decided not to this round, maybe next time.
Students used this landscape photograph to draw from. I told the students they did not have to do the reflection in the water, but they were allowed to if they wanted!
This lesson is a great way to get students thinking about the element of line!
Here are some student examples! I apologize for the quality/shadows on each photograph. I take these photos with my iPhone, it's hard to capture the beautiful art completely!
Labels:
3rd Grade,
Art,
Art Lesson,
Art Teacher,
Crayons,
Creativity,
drawing,
Elementary,
Elementary School,
Landscape,
Line,
New Art Teacher,
New Teacher
Friday, August 31, 2012
Kindergarten Houses: Using Squares
This lesson is basically just a repeat of the rectangle lesson, only squares are discussed instead. The students point out squares in the room. I find that students think many rectangular things are actually squares. I suppose it is easy to confuse these two shapes as they are very similar. I did not even attempt to explain to my students that squares are rectangles but rectangles are not squares!! We did discuss the difference between squares and rectangles again.
Students make the brown square into a house and have the freedom to make whatever they would like out of the second, purple square. Some made a second house, a garage, a tree-house (my favorite!), and others just glued it down and ignored it.
For instruction, I mostly just reviewed the same steps as last week, i.e. where to glue, how much glue to use, which paper to put the glue on, etc. Next week we will tackle triangles (and scissors!! Yikes!)
Kindergarten is so diverse! Here are some student examples! You may notice some of the paper is different colors. Both colors are blue, just some of them are more green-y!
Wednesday, August 22, 2012
Kindergarten Buses: The Student Edition
Yesterday I remembered to take some pictures of the buses. Lucky for you, I'm willing to share these precious photos!!
This student added two trees and made their second rectangle into a house!
Sometimes when the teacher suggests an idea, it really "takes off" in the students' minds.
This rocket-ship is pretty awesome!
Sometimes buses are green.
The traffic light detail is just perfect!
This student loved the bird in the example and succeeded in drawing her own!
This student's dad is in the rocket-ship!!
I love how this student made branches on the tree.
When I took this picture, the student had not yet added the second rectangle. (I love slow workers!)
Busy hands at work on STORM CLOUDS!
...and also a butterfly. Very important detail.
Apparently, this student rides a very bumpy road to school!
Just kidding, that's obviously grass.
I'm pretty sure a tornado is happening in this one.
Seriously, these students love coloring tornadoes. At least one student draws a tornado every day.
Yet another rocket-ship! Who knew buses and rockets could be friends?!
Kindergarten apparently knows more than I!
I hope you enjoyed these student examples. Although these photos are only from one class, all my classes are quite charming (and wonderfully creative artists!)
Tuesday, August 21, 2012
The Wheels on the Bus...
...go round and round!
The most successful and complete project I have done thus far (it is only the second week!) has been with Kindergarten. To be honest, I stole this lesson "series" on shapes from my supervising teacher during student teaching. Many of my lessons are from her, but one really can not blame me when she has 30+ years of experience under her belt! Of course I'm going to steal her lessons, she knows they work!
Kindergartners learn about rectangles through this lesson. I start out by holding up a sheet of construction paper and asking students what shape it is. Some will shout out the answer, some shout out the wrong answer "square!". I ask students what the difference between a square and a rectangle is i.e. two long sides, two short sides. Then I ask students to raise their hands and tell me other rectangles they see in the room. "The door!" "Class, is that a rectangle?" "YES!"
Before the kinders came to class, I precut 2 different colored 3x5 inch rectangles. One is yellow, one is a different color. I prefer red (firetruck), but as my supplies are low at the beginning of this year, and I have not had a chance to order any more, I used green.
I hold up the yellow rectangle and ask students what they could make it into. "What is yellow and a rectangle?" I call on students until someone says bus. It can take some hinting to get them to think of it: "It goes up and down the roads. Some of you might ride them to school."
I go through gluing step-by-step with the students, instructing them to use small dots of glue. I even draw it on the board so they can see exactly where to put the glue in addition to demonstrating with a "bus" of my own!
After students glue the bus down on 12x18 paper (I used brown), they are instructed to make it look like a bus and to color a background using crayons. It takes a lot of prompting i.e. "how about a road? or some trees? What is the weather like?"
This is my example (don't judge it, I worked very quickly on this!). I did not show it to the students until after they were already working because I did not want a replica of my own work. The students had snow, rain, flowers, etc. One student even had a birdhouse!
My class is 50 minutes, which is a long time for kinders. After they have worked on this picture, I give them a second rectangle. This they are instructed to make into whatever they want. This requires that they think about what else can be shaped like a rectangle.
I did not do anything with my green rectangle because I want for my students to come up with their own ideas. Some of the green rectangles were made into vans, dump trucks, limosines, and even a few school buildings! My kinders are so clever!
Today, I am teaching this lesson again to the second Kindergarten class. Since I travel between two elementary schools, I will teach this lesson a total of four times. Hopefully during one of those lessons I will remember to take pictures of the students' art!
Next week, we will tackle squares...and scissors!
The most successful and complete project I have done thus far (it is only the second week!) has been with Kindergarten. To be honest, I stole this lesson "series" on shapes from my supervising teacher during student teaching. Many of my lessons are from her, but one really can not blame me when she has 30+ years of experience under her belt! Of course I'm going to steal her lessons, she knows they work!
Kindergartners learn about rectangles through this lesson. I start out by holding up a sheet of construction paper and asking students what shape it is. Some will shout out the answer, some shout out the wrong answer "square!". I ask students what the difference between a square and a rectangle is i.e. two long sides, two short sides. Then I ask students to raise their hands and tell me other rectangles they see in the room. "The door!" "Class, is that a rectangle?" "YES!"
Before the kinders came to class, I precut 2 different colored 3x5 inch rectangles. One is yellow, one is a different color. I prefer red (firetruck), but as my supplies are low at the beginning of this year, and I have not had a chance to order any more, I used green.
I hold up the yellow rectangle and ask students what they could make it into. "What is yellow and a rectangle?" I call on students until someone says bus. It can take some hinting to get them to think of it: "It goes up and down the roads. Some of you might ride them to school."
I go through gluing step-by-step with the students, instructing them to use small dots of glue. I even draw it on the board so they can see exactly where to put the glue in addition to demonstrating with a "bus" of my own!
After students glue the bus down on 12x18 paper (I used brown), they are instructed to make it look like a bus and to color a background using crayons. It takes a lot of prompting i.e. "how about a road? or some trees? What is the weather like?"
My class is 50 minutes, which is a long time for kinders. After they have worked on this picture, I give them a second rectangle. This they are instructed to make into whatever they want. This requires that they think about what else can be shaped like a rectangle.
I did not do anything with my green rectangle because I want for my students to come up with their own ideas. Some of the green rectangles were made into vans, dump trucks, limosines, and even a few school buildings! My kinders are so clever!
Today, I am teaching this lesson again to the second Kindergarten class. Since I travel between two elementary schools, I will teach this lesson a total of four times. Hopefully during one of those lessons I will remember to take pictures of the students' art!
Next week, we will tackle squares...and scissors!
Labels:
Art,
Art Lesson,
Art Teacher,
Bus,
Crayons,
Creativity,
Elementary,
Elementary School,
Glue,
Kindergarten,
Kindergarten Art Lesson,
Landscape,
Rectangle,
School,
School Bus,
Shapes,
Teacher