Pages

Friday, August 31, 2012

Kindergarten Houses: Using Squares

This lesson is basically just a repeat of the rectangle lesson, only squares are discussed instead. The students point out squares in the room. I find that students think many rectangular things are actually squares. I suppose it is easy to confuse these two shapes as they are very similar. I did not even attempt to explain to my students that squares are rectangles but rectangles are not squares!! We did discuss the difference between squares and rectangles again.

Students make the brown square into a house and have the freedom to make whatever they would like out of the second, purple square. Some made a second house, a garage, a tree-house (my favorite!), and others just glued it down and ignored it. 

For instruction, I mostly just reviewed the same steps as last week, i.e. where to glue, how much glue to use, which paper to put the glue on, etc. Next week we will tackle triangles (and scissors!! Yikes!)

Kindergarten is so diverse! Here are some student examples! You may notice some of the paper is different colors. Both colors are blue, just some of them are more green-y!


First Grade Dogs

Yikes! I came to my second school and realized nearly too late that the classes here had already finished their faces!! This is because I see these classes twice a week and the others only once. I had to come up with something fast!!

Thanks to Deep Space Sparkle, I was able to find a cute project quickly. The first day, the students drew their dogs. I used the ELMO to show my drawing magnified on the projector screen. This worked for most of them; others I may need to sit next to me next time in order to make sure they are able to follow along. The dogs turned out so cute!


The next class day, I had the students finish up their dogs. While they were finishing, I had a group of three at a time come to a station and paint a second paper half blue and green. This is for the sky and the ground. I used tempera paint for this. I thank my summer experience at TLZ as an assistant art teacher, because otherwise I would not have been as effective at showing students how to hold a paint brush (Thank you, Amy!) I did not get through all of the students, so I will have an activity next week and pull those aside that have not finished painting yet.

I can't wait to see and share the final projects!

Wednesday, August 29, 2012

Heart Art Display

Only one class has finished this project thus far. The second 3rd grade class will finish theirs today. I have one class of 3rd grade at my second school, and they will start Thursday and finish Friday. Since one class has finished, I put their beautiful "heart art" up in a display case. I hope they are excited when they walk in and see it!

I told the students I would not display their names (just the class) and to let me know on the back if they wanted their art up or not. I had about four students tell me "no!" which worked out perfectly. The display cases normally will have three-dimensional art, but we have not made any yet!


I suppose there is SOME room still on the bottom, but it's pretty dark! I was really tempted to put the stencils in the display case too, but I didn't. I'm still brainstorming for ideas of what to do with the stencils. I think I have an idea brewing...

Tuesday, August 28, 2012

Jim Dine: 3rd Grade Heart Art

This is another project that I took away from student teaching. The students looked at pictures of Jim Dine's hearts. They always think his hearts are really cool. I make a point of asking them beforehand if they know how to draw hearts and also if they think that they could have a job as an artist just by making hearts. They usually answer yes to the first one and then slowly lower their hands at the second one.

I walked through the stencil-process with the students step-by-step. The students fold the tag-board (or recipe files, in our case!) in half and then draw half of a heart on the fold. I walk around to make sure they have actually drawn it on the fold and also to check and see if their heart-half will result in something that resembles a heart. Some need the dip in the heart lowered.


I honestly think the stencils end up being the most interesting thing about this project! They're so beautiful! Perhaps I will come up with something for the students to do with the stencils...my mind is running already!

The students used the stencils to make these wonderful heart pictures! I apologize for them all being portrait rather than landscape, but it's late and a school night!


She decided they needed to be broken hearts!


This student varied the width of the heart.
I'm pretty sure it was on accident, but it looks so interesting!


So there you go! Not an original idea of mine, but this project is so cute! It's supposed to be an introductory lesson to another involving ceramics, but I'm not sure how the kilns here work. Hopefully, one of the more experienced art teachers can do a run-through with me so I can do the clay project with my students!

Thursday, August 23, 2012

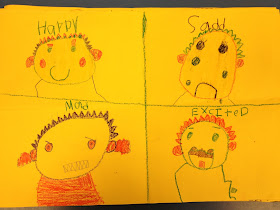
What Does This Emotion Look Like? - 1st Grade

This is yet another lesson I have taken away from my supervising teacher. 1st graders are creating four faces with different emotions. This lesson takes two days. Each day I can get through two of the faces.

The first day, I pass out paper (and crayons if they did not bring any - this project is crayons only!) and walk the students through folding it into fourths. A lot of the students need help. They fold it wrong or do not know how to fold at all. I could just give them one sheet of paper for each, but I like that this displays the faces all together as a series for each student! Plus, folding is a nice skill to develop.

I start by writing an emotion on the board. I ask students to read the word to me. I always do "Happy" first. I ask students to show me what they look like when they are happy.

I then turn to the board and draw a face outline. It makes it easier for students if you split the board into two or four sections. This way they understand better that they are not drawing on top of the entire picture, but just in one section at a time.

I ask students to raise their hand and tell me one feature to add at a time. I am careful to remind students that eyes are not on the forehead. I also make sure students are adding eyebrows (these are so easy to forget!)

Here is what two of my examples on the board looked like (don't make fun!). I purposefully use many colors because I want my students to do the same. I also diversify the gender, hair color, eye color, etc. I don't always diversify skin color because I just use the green of the chalk board; however, I am going to start using more than just the "white" chalk for outlines. Hopefully, this will make the chalkboard's ethnicities look more diverse.


I try to do goofy things (like steam coming out of the ears) and add little details (bow, freckles, etc.) so that students will begin thinking about what details they can add. If the students finish early, I have them do a background for each section.

Here are some examples from one of my 1st grade classes!


This student accidentally drew two happy faces (he was just so happy!).
We fixed this by just adding another face that was sad.


This boy wanted his surprised face to have eyes popping out of their sockets!
What a creative idea!


I love the striped backgrounds.


Those are freckles, not pimples!


As you may have gathered, I have great artists in my 1st grade class!! We may have to do MORE emotions!


Wednesday, August 22, 2012

Kids say such funny things!

This is from a lesson (coming soon) that I am doing with my first graders. It deals with drawing emotions on people's faces. The first emotion was "Happy," naturally. One of my first graders showed her example to me at the end of class as she was turning it in:


"She's happy 'cause she's getting married!"

Ah, so she is! I love the detail of the bride's veil, jewelry, and even makeup! I cannot wait to see what this student, along with the rest of my students, comes up with for the other emotions!

Kindergarten Buses: The Student Edition

Yesterday I remembered to take some pictures of the buses. Lucky for you, I'm willing to share these precious photos!!


This student added two trees and made their second rectangle into a house!


Sometimes when the teacher suggests an idea, it really "takes off" in the students' minds.
This rocket-ship is pretty awesome!


Sometimes buses are green.
The traffic light detail is just perfect!


This student loved the bird in the example and succeeded in drawing her own!


This student's dad is in the rocket-ship!!


I love how this student made branches on the tree.
When I took this picture, the student had not yet added the second rectangle. (I love slow workers!)


Busy hands at work on STORM CLOUDS!
...and also a butterfly. Very important detail.


Apparently, this student rides a very bumpy road to school!
Just kidding, that's obviously grass.


I'm pretty sure a tornado is happening in this one.
Seriously, these students love coloring tornadoes. At least one student draws a tornado every day.


Yet another rocket-ship! Who knew buses and rockets could be friends?!
Kindergarten apparently knows more than I!

I hope you enjoyed these student examples. Although these photos are only from one class, all my classes are quite charming (and wonderfully creative artists!)

Tuesday, August 21, 2012

The Wheels on the Bus...

...go round and round!

The most successful and complete project I have done thus far (it is only the second week!) has been with Kindergarten. To be honest, I stole this lesson "series" on shapes from my supervising teacher during student teaching. Many of my lessons are from her, but one really can not blame me when she has 30+ years of experience under her belt! Of course I'm going to steal her lessons, she knows they work!

Kindergartners learn about rectangles through this lesson. I start out by holding up a sheet of construction paper and asking students what shape it is. Some will shout out the answer, some shout out the wrong answer "square!". I ask students what the difference between a square and a rectangle is i.e. two long sides, two short sides. Then I ask students to raise their hands and tell me other rectangles they see in the room. "The door!" "Class, is that a rectangle?" "YES!"

Before the kinders came to class, I precut 2 different colored 3x5 inch rectangles. One is yellow, one is a different color. I prefer red (firetruck), but as my supplies are low at the beginning of this year, and I have not had a chance to order any more, I used green.

I hold up the yellow rectangle and ask students what they could make it into. "What is yellow and a rectangle?" I call on students until someone says bus. It can take some hinting to get them to think of it: "It goes up and down the roads. Some of you might ride them to school."

I go through gluing step-by-step with the students, instructing them to use small dots of glue. I even draw it on the board so they can see exactly where to put the glue in addition to demonstrating with a "bus" of my own!

After students glue the bus down on 12x18 paper (I used brown), they are instructed to make it look like a bus and to color a background using crayons. It takes a lot of prompting i.e. "how about a road? or some trees? What is the weather like?"


This is my example (don't judge it, I worked very quickly on this!). I did not show it to the students until after they were already working because I did not want a replica of my own work. The students had snow, rain, flowers, etc. One student even had a birdhouse!

My class is 50 minutes, which is a long time for kinders. After they have worked on this picture, I give them a second rectangle. This they are instructed to make into whatever they want. This requires that they think about what else can be shaped like a rectangle.


I did not do anything with my green rectangle because I want for my students to come up with their own ideas. Some of the green rectangles were made into vans, dump trucks, limosines, and even a few school buildings! My kinders are so clever!

Today, I am teaching this lesson again to the second Kindergarten class. Since I travel between two elementary schools, I will teach this lesson a total of four times. Hopefully during one of those lessons I will remember to take pictures of the students' art!

Next week, we will tackle squares...and scissors!

Monday, August 20, 2012

Block Letters and Graffiti (2nd & 3rd grade)

I used this as a filler project during my first week. I talked to students about graffiti, then demonstrated how to make block letters/graffiti. I must admit, I have no experience with graffiti (spraypainting OR drawing) so I did my research beforehand. I found this site to be very helpful.

I told the students just to start out by writing their name. I used the word "ART" as an example. I purposefully made my letters jumbled/not lay on the same "line."

I then demonstrated these three steps:
  1. How to draw block letters
  2. How to attach the letters to one another, add arrows, broken pieces, etc.
  3. How to trace around the word
I left the background patterns up to the students. Some of the results were pretty awesome, so I'm going to share them here!


EDIT: Some of my students are having a hard time remembering all the steps when they come back to class to work on these. Let's face it, there is a lot to remember. So, this is what I've been reviewing at the beginning of every class (quickly). I number all of the steps in a different color. I use the same, corresponding color to demonstrate that step and leave it up for students to reference. It's much easier to say "you still need to do step 3," than to explain what they need to do over and over again. It also allows me to help more students.